
The variances available when creating a new VPO are based on the security permissions for the user in WMS under Setup> Security Manager> Variance Category tab.
In the Builder Portal navigate to
the VPO List.
For VPO only users this will be a link at the top of the screen labeled
VPO.
For Superintendents that also have access to VPOs this will be located
in the Builder Portal dropdown, and is called VPO.
To create a new VPO, select the
Add VPO button.

Fill in the fields accordingly.
· Description: This is a user defined description of the VPO. If no description is input at the time the VPO is created, the system will input the description as VPO and VPO Number. For example if the VPO Number is 16, the description will reflect VPO 16.
· Area*: The Area field will need to be selected before being able to select the job associated to the VPO.
· Job*: The jobs will be available after an area is selected and the job list will be filtered by the area selected.
· Address: The address field will display once a job is selected. This field is not editable but provides the user with the address of the job.
· Supplier Invoice Number: This allows the user to input a supplier invoice for the corresponding VPO being created.
· Variance*: These variance categories will be the same variance categories used in WMS Purchasing. A user must be given access to the variance categories in Security Manager screen of WMS, in order for that variance category to display in the Builder Portal.
· Purchasing Activity: The
list of purchasing activities will be the same purchasing activities used
in WMS Purchasing. If a purchasing activity is selected, it will prefill
the Trade field below according to what is setup in WMS on the Purchasing
Activity screen. It
will also narrow the list of Items to add to the VPO.
In addition, the Enhanced VPO workflow can be setup to use the default
VPO Item configured for the selected Purchasing Activity when adding One
Time Items to the VPO. The
default VPO Item is configured in WMS on the Purchasing Activities screen.
· Phase: A phase can only be selected if a purchasing activity is selected. This will then produce a list of available phases within that purchasing activity. If a phase is selected, it will narrow the list of Items to add to the VPO.
· Trade*: The Trade field will be predefined if a purchasing activity is selected based on the WMS Purchasing Activity screen. However if a purchasing activity has not been selected for the VPO, the list of trades will correspond with WMS from the Setup> Trades screen. Once a trade is specified, the list of suppliers will populate accordingly with suppliers assigned to the trade for the area on the job.
· Supplier*: The list of suppliers will be in relation to the trade selected for the VPO in accordance with the Trade Supplier Assignment screen found in WMS under the Setup menu.
· Supplier Contact*: The supplier contacts will be a list of contacts associated to the supplier record in WMS.
· Backcharge Supplier: With the default setup of the Standard and Enhanced workflows the list of backcharge suppliers is defined by a those suppliers assigned to the trade specified. However, the setup can be changed so that the list of backcharge suppliers is defined by those suppliers with a PO issued on the job selected.
· Backcharge Supplier Contact: The backcharge supplier contacts will be a list of contacts associated to the backcharge supplier record in WMS.
* Fields marked with an asterisk are required fields and must be filled in before an Item can be added to the VPO and before the VPO can be created.
Notes:
- When using the Enhanced workflow, the purchasing activity will be required for One Time Items, if the ‘Use Purchasing Activity Default VPO Item’ setting is set to True. If the setting is set to False then defining the Purchasing Activity on the VPO is not required. This setting is found in the VPO Settings tab on the Builder Portal under Setup> Account.
- Custom fields can be defined for VPOs, including required fields. These fields would be completed by clicking the Custom Fields tab at the top of the screen.
An item or items will be added to the VPO by either the Add Item function or the One Time Item function.
Use the Add Item function to choose an item from the WMS Item database. The list of Items available within this function will be narrowed down according to the Purchasing Activity, Phase and Trade selections.
Use the One Time Item function to add an item to the VPO that does not exist within the WMS Item database. Ie. Create an item on the fly. The One Time Item feature can be activated or de-activated with the ‘Disable One Time Item’ setting found on the VPO Settings tab on the Builder Portal under Setup > Account.
Add Item:
Click
on the Add Item button.

The
Add Item dialog windows will appear.
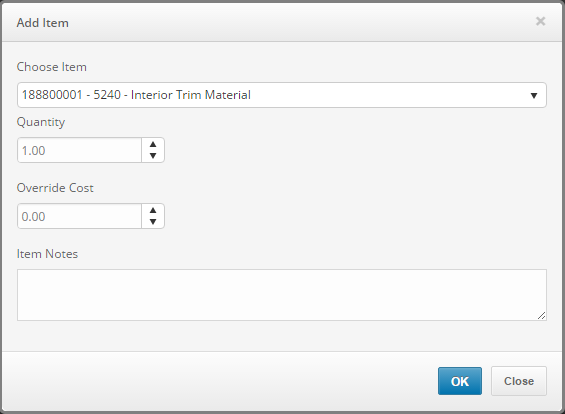
Choose the item from the dropdown list, then input the quantity.
Optional: If a different cost needs to be applied than what is defined in Cost management of WMS, input that cost in the Override Cost field. A user must be given access in the Security Manager screen of WMS, to have the ability to input a cost in the Override Cost field. Optional: Add a note to the item.
Click OK and the item will be added to the VPO.
One Time Item:
Click
on the One Time Item button.
The
Add One Time Item dialog window will appear.
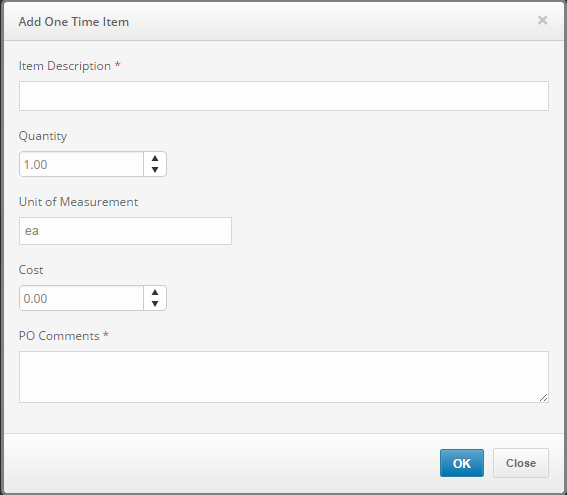
Complete
all fields.
Item Description: The item description will describe what the
item is, such as a 10 ft 2 x 4.
Quantity: The quantity will be the amount of the item needed. For
example, if I input 3 this indicates I need 3 10ft 2 x 4’s.
Unit of Measure: This defines the type of measurement being applied
such as each (ea) or lump sum (ls).
Cost: This will be the cost of the individual item. Per the above
example, if I input 2.60 for the cost. This is the cost for one 2x4,
and the total pretax cost would be $7.80. The
Cost can remain 0.00.
PO Comments: The comment input in this field will be reflected
on the PO report that is sent to the supplier.
Click OK and the item will be added to the VPO.
Before the VPO is created, items that have been added to the VPO can be either removed or edited as needed. This is done with the Remove Item function and the Edit Item function.
Remove Item:
To remove an item from the VPO, check the checkbox next to the item you wish to remove.
Then
select the Remove Item button.
Edit Item:
To edit an item, check the checkbox next to the item you wish to modify.
Then
select the Edit Item button.

This will then bring up either the Edit Item dialog window, or the Edit One Time Item dialog window.
Click OK to apply the changes to the item.
Click on Create to create the VPO.