
Using the VPO List (VPO Users)
The following outlines the functionality a VPO user will have on the VPO List page. For suppliers, please see, Using the VPO List (Suppliers).
The user defined as the VPO Admin within VPO Settings, will see all of the VPOs in the database in any status. In addition the user that created the VPO will always see that VPO. The other users involved in the VPO workflow will only see the VPO when it is pending their approval, see the following chart for more information.
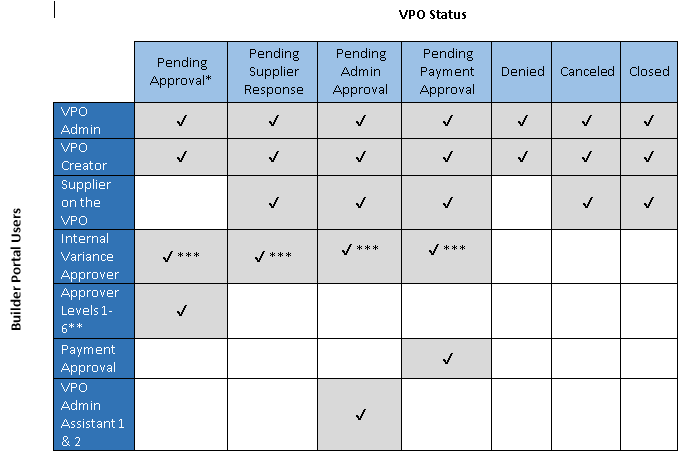
* - Pending approval will be the status if the VPO is assigned to an Approval Level 1 -6 or if an internal approval is pending.
** - Only the Approver Level currently assigned will see the VPO. For example, if Approval Level 1 has approved the VPO, and the VPO is pending approval from Approver Level 2. The user assigned as Approver Level 1 will no longer see the VPO, but the user assigned as Approver Level 2 will see the VPO.
*** - Internal Variance Approval does not have its
own status and can happen simultaneously during the Pending Approval and
Pending Supplier Response. Once the user assigned as the approver of the
particular variance used has approved the VPO, it will no longer display
in the list of VPOs.
Note: The Supplier Response, Internal Variance Approval, and Admin Approval are only used in the enhanced VPO workflow.
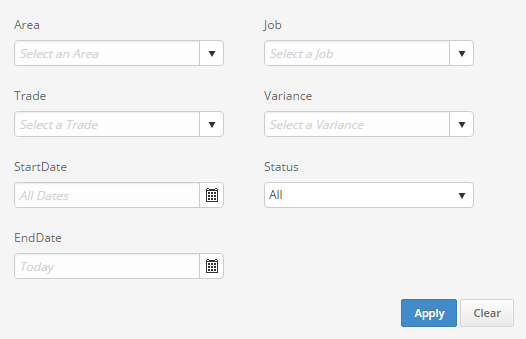
Using the Filter on the VPO List:
The filter button  is found in the upper right
corner of the VPO List. Once a user selects this, the following options
become available. A user can select one or multiple filter options to
narrow down -the VPOs to be displayed on the VPO List. Click Apply to
apply the filter, or select Clear to clear all filters.
is found in the upper right
corner of the VPO List. Once a user selects this, the following options
become available. A user can select one or multiple filter options to
narrow down -the VPOs to be displayed on the VPO List. Click Apply to
apply the filter, or select Clear to clear all filters.
Area – The area will only display VPOs associated to jobs within the area selected. In addition, the Area selection is required if the user wishes to filter by Job.
Job – The job will only display VPOs associated to the job selected.
Trade – The trade will only display VPOs with the trade selected.
Variance – The variance will only display VPOs with the variance selected.
Start
Date and End Date – These allow a date range to be selected
to only display VPOs created within the range.
Examples:
If, no end date is specified, and a start date of Oct. 12, 2015
is selected, then the VPO List will be filtered to only show VPOs
created on or after Oct 12, 2015.
If, no start date is specified, and an end date of Oct. 12, 2015
is selected, then the VPO List will be filtered to only show VPOs
created on or before Oct 12, 2015.
Status – The following status are available. When a status is selected the VPO List will only display VPOs currently at the status selected, or if “All” is selected then VPOs of all statuses will be displayed.
o All
o Pending Approval
o Pending Supplier Response
o Pending Admin Approval
o Pending Payment Approval
o Denied
o Canceled
o Closed
Knowing your Action Items:
 View: When a user clicks on the view action item it will bring up
the VPO details, and provide access to the custom fields tab, attachments,
and task history for that particular VPO.
View: When a user clicks on the view action item it will bring up
the VPO details, and provide access to the custom fields tab, attachments,
and task history for that particular VPO.
 Copy:
When a user clicks on the copy action item, this will copy the VPO, and
allow the user to create a new VPO prefilling in the details from the
copied VPO. A user can then edit fields of the VPO as needed before creating.
Copy:
When a user clicks on the copy action item, this will copy the VPO, and
allow the user to create a new VPO prefilling in the details from the
copied VPO. A user can then edit fields of the VPO as needed before creating.
 Compose
Message: This allows the user to compose a message to another Builder
Portal user in regards to the VPO. Providing prefilled information about
the selected VPO including a link to the VPO.
Compose
Message: This allows the user to compose a message to another Builder
Portal user in regards to the VPO. Providing prefilled information about
the selected VPO including a link to the VPO.
 Add VPO:
See Creating a VPO for more details.
Add VPO:
See Creating a VPO for more details.
 Export:
Clicking this button will create a csv file of the VPO list displayed
on the VPO screen.
Export:
Clicking this button will create a csv file of the VPO list displayed
on the VPO screen.
 Print:
Clicking this button will produce a printable version of the VPO list
from the VPO screen.
Print:
Clicking this button will produce a printable version of the VPO list
from the VPO screen.